Windows Server Software RAID Setup and Configuration

Last modified: Monday January 22nd, 2024

The following guide describes how to manually setup a drive mirroring (RAID1) in a Windows operating system.

Introduction

Servers that have been installed using our automatic Windows installation, or ordered with the Windows addon, already have a RAID level 1 configured and running on them. So this guide is just intended for custom Windows installations.

Preparation

1. First, please click on the Windows symbol in the bottom left corner, or press the Windows or Super key.

2. Type diskmgmt.msc and press the Enter key to open the Disk Management Utility.

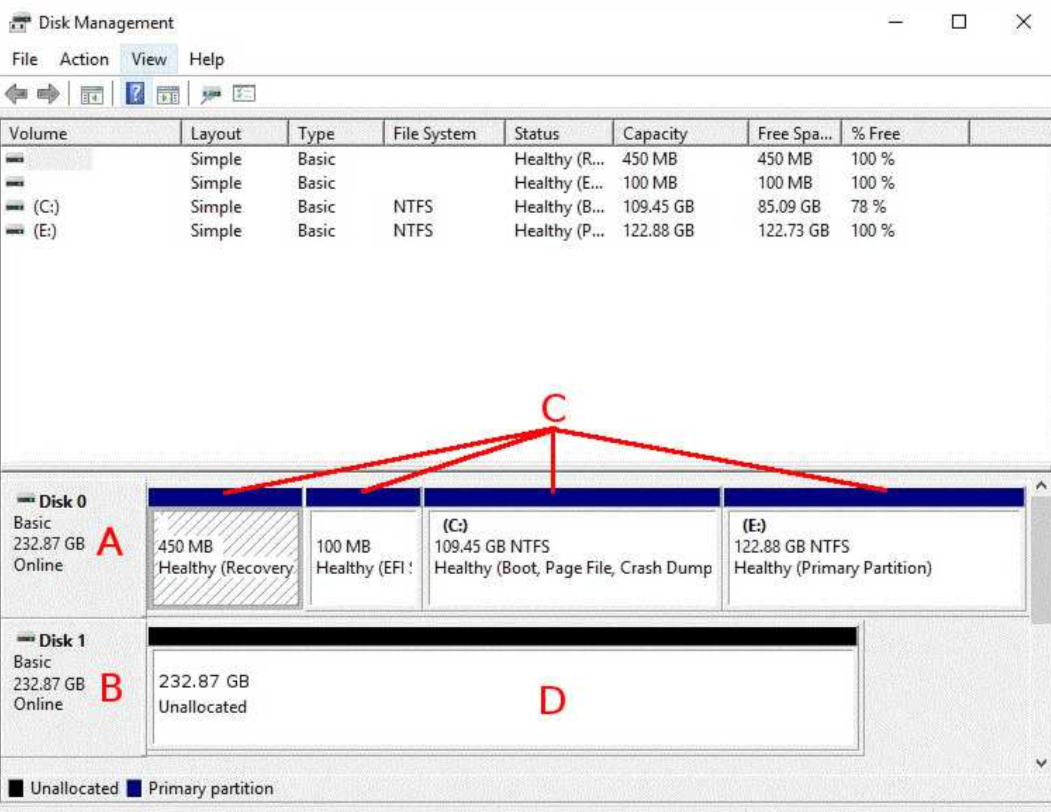
Please find a quick overview of the utility below:

[/vc_column_text]

Windows Server Software RAID Setup and Configuration disc management
  • A: Main disk, which contains the operating system
  • B: Second disk, intended to be used for the RAID1 mirroring
  • C: Volumes (means partitions under Windows) on the main disk
  • D: Unallocated space on the second disk

3. If your second disk already has Volumes on it, please right-click on them and choose Delete Volume on all of them.

4. Right-click on the disk which currently contains the operating system and click on Convert to dynamic disk.

5. In the dialog that then appears, the main drive should already be selected. Please also select the other drive which you would like to use for the RAID1. Click on Ok and confirm.

6. Now you have to determine if your system has been installed in Legacy Mode, or in UEFI Mode. To do this, please click on the Windows symbol in the bottom left corner, or press the Windows or Super key.

7. Type msinfo32.exe and press the Enter key to open the System Information window.

8. In the right side of the window, you should see the BIOS MODE entry, which has the correct mode (Legacy or UEFI) as its value. If you cannot find this entry, the system is installed in the Legacy mode. Now, continue below to either “Legacy” or “UEFI”.

Legacy

If your system is running in Legacy mode, you should do the following steps on all the Volumes of the main disk. Work on the Volumes from left to right:

  1. Right-click on a Volume and choose Add mirroring from the context menu.
  2. In the menu that appears, choose the second drive you would like for the RAID1. Then confirm by clicking on Add mirroring.

Please check that you have correctly added all the Volumes to the mirroring. Also check that the synchronization is running, which is indicated by the reddish colored Volumes and their status information.

UEFI

Every UEFI system has a UEFI System Volume. This partition cannot be mirrored automatically by Windows; you need to manually copy and configure it on the second drive. Like with Legacy, add the mirroring for the Volumes one by one, from left to right.

  • For all Volumes, that do not have the EFI label, follow those steps:
    1. Right-click on a Volume and choose Add mirroring from the context menu.
    2. In the menu that appears, choose the second drive you would like for the RAID1. Then confirm this by clicking on Add mirroring.
  • For the UEFI System Volume, please use the following steps:
    1. Create an UEFI System Volume with the same size on the second drive and format it with FAT32. To do this, just right-click on the unallocated space of the second drive, select New Simple Volume and follow the dialog.
    2. Copy the UEFI System Volume data from the first drive to the second. To do that, we recommend that you boot the server and connect to it via SSH:
      • Locate the correct partitions:
        parted -l

        This command will list the partitions of all drives. There, please search for two UEFI partitions on both drives which you might identify by their sizes and filesystem (FAT32) and combine the disk identifiers (/dev/sdX) with the correct numbers of the partitions.

        Example:

        parted -l
        Model: WD Enterprise P20691
        Disk /dev/sda: 2000GB
        Sector size (logical/physical): 512B/512B
        Partition Table: msdos
        Disk Flags:
        
        Number  Start   End     Size    Type     File system  Flags
         1      1049kB  101MB   100MB   primary  fat32
         2      102MB   2000GB  1999GB  primary  ntfs

        In this case, the partitions are /dev/sda1 and /dev/sdb1.

      • Create mount point folders:
        mkdir /mnt/main
        mkdir /mnt/second
      • Mount the correct UEFI System partitions. (Replace the partitions with the ones you have found):
        mount -t vfat /dev/sda1 /mnt/main -o rw,umask=0000
        mount -t vfat /dev/sdb1 /mnt/second -o rw,umask=0000
      • Next, copy all the files from the current UEFI System partition to the new one:
        cp -ar /mnt/main/ /mnt/second/
      • Once you’re finished, boot the server back to the installed system:
        reboot

Important note: The UEFI System partition can’t be mirrored. The process as described above is therefore always required if you replace a drive or if you have make changes to the bootloader configuration.

Please ensure that you have added all other Volumes to the mirroring. And check that the synchronization is running, which is indicated by the reddish colored Volumes and their status information.

If you face any issues with certain Volumes, or the second Plex (which is a part of a mirrored Microsoft Volume) is not bootable, please see the official documentation.

Was this article helpful?
Views: 1835

10 Years Beehosting!
Celebrate with 70% OFF + FREE Site Transfer.

Facebook Instagram linkedin

Beehosting.pro website uses cookies

We use cookies to personalise content and ads, to provide social media features and to analyse our traffic. We also share information about your use of our site with our social media, advertising and analytics partners who may combine it with other information that you’ve provided to them or that they’ve collected from your use of their services.

Menu