Partitioning a Hard Drive in WINDOWS.
This article serves as an example of how you can: independently partition a hard drive, add or remove a new drive letter, create a new partition in the Windows operating system. I would like to draw your attention to the fact that the terms partition and volume are used interchangeably. The easiest, so to speak, standard way is to divide the hard drive using the tools of the operating system itself. The main advantage is that everything is done in Windows Explorer. This example is based on Windows Server 2012 Standard.
Why do you need to partition a hard drive?
There are several reasons why you should partition a hard drive: it is convenient, safe, etc. In case you need to reinstall the operating system, your hard drive will be formatted. You simply may not have time to transfer all the necessary data to an external drive. Therefore, this will save you nerves and time. For security reasons, it is not worth storing data in one place.
Another reason for disk partitioning is if you need to install a second operating system. It’s more convenient when everything is in its place.
In this article, we have tried to prepare it for you as accurately as possible so that you cannot make a mistake and do everything exactly as it should be.
Adding a new drive letter
To create more storage space or allocate some of the free space on an existing hard drive, add a new drive letter to your computer using one of the following methods:
- Installing a new drive – If you need more disk space for storing data, install another hard drive or connect a USB storage device. The new hard drive can be either internal or external. In this case, Windows automatically assigns it a letter.
- Partitioning an existing drive – If you don’t need additional disk space but want a separate drive within Windows, simply create another partition on the installed hard drive. In this way, this separate space will be treated by the system as another drive and will have its own drive letter.
In this article, we will discuss the second example. This solution is free and safe. If for any reason your main C drive crashes, the additional partition (let’s call it “D”) will store the information recorded on it. This way, you won’t lose all your data. Let’s take a look at how to create a new partition.
Creating a new partition
So we’ve already covered that to create free space, you need a hard drive that already has a primary partition. To reassign free space on the hard drive by creating more volumes, you need to have unallocated space that is not part of an existing partition. Compress the existing hard drive to create used space, and then create and format a new partition.

Let’s break this down step by step:
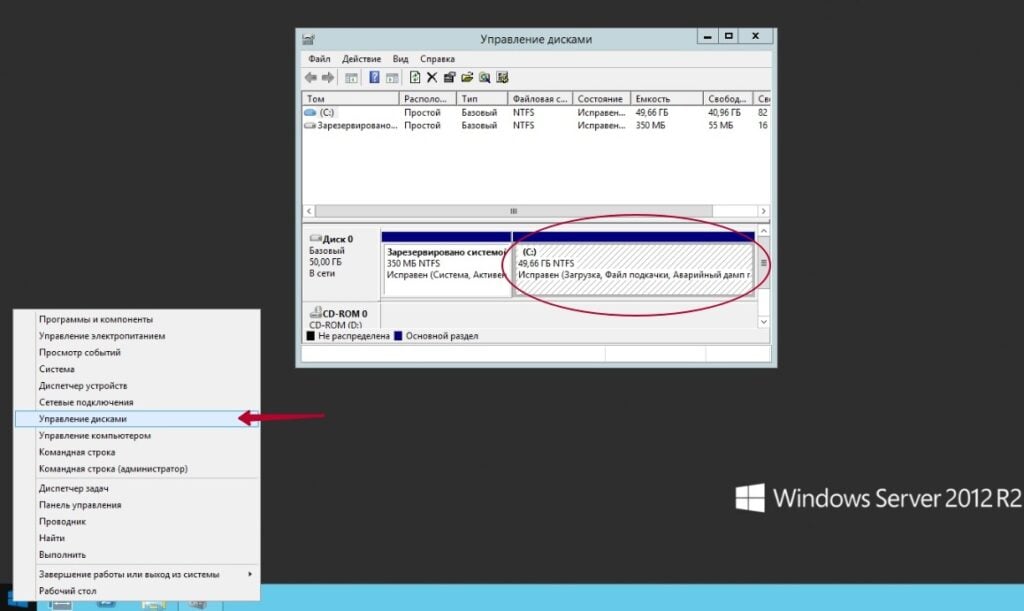
To open the “Disk Management” utility, right-click the “Start” button. From the dropdown menu, select the desired option. A window will open displaying information about storage devices installed on the computer.

To create unallocated space on the hard drive, right-click the disk on which you want to create a partition.

In the “Size of available space (MB)” field, specify the size of the new partition. After the resizing process is complete, the new volume will be displayed in the “Disk Management” utility as unallocated space. Right-click on the new partition. In the menu that appears, select “Create a simple volume…”.

Right-click on the new partition. In the menu that appears, select “Create a simple volume…”.

Simple New Volume Wizard window will open. Click Next to continue. A “Specify Volume Size” window will appear on the screen. Enter the volume size or click Next to accept the default settings.

A “Assign Drive Letter or Path” window will appear on the screen. Select a drive letter and click Next.

Do not select “Quick Format” or “Enable file and folder compression.” You don’t need to specify anything in the “Volume label” field.

At the end of the Simple New Volume Wizard, a settings window will appear on the screen. Click Finish.

Wait for the formatting process to complete, after which the new partition will be displayed in the “Disk Management” utility.

Changing the drive letter
Each drive on your computer can be assigned letters from C to Z. Letters A and B are intended for floppy disk drives or removable media. If your computer does not have a floppy disk drive, you can assign letters A and B to volumes.
Note.
Some programs refer to specific drive letters. Changing the drive letter can cause some installed programs to work incorrectly. The drive letter of a system or boot drive cannot be changed.
To change this parameter, follow these steps:
To open the “Disk Management” utility, right-click the “Start” button. From the context menu, select the appropriate option. A window will open displaying information about storage devices installed on the computer.

Right-click on the partition or drive you want to rename, and select Change Drive Letter and Paths….

In the “Change Drive Letter and Paths” window, click on Change…

Select a new drive letter from the menu. Then click the OK button.

A warning window from the Disk Management utility will appear. To continue, click Yes.

Now, as you can see, the letter has changed from E to K.

Removing Drive Letter
You can clear storage space and access it on your computer by removing drive letters. The drive letter of a hard drive can be removed using the “Disk Management” utility.
Important!
Removing a volume will also delete all data recorded on it. Make a backup of the data you need.
Create a backup of the data on the drive you want to remove. Go to the “Disk Management” window and right-click on the drive letter you want to remove. Click Change Drive Letter and Paths….

In the “Change Drive Letter and Paths” window, click Remove.

A warning window from the Disk Management utility will appear. To continue, click Yes.

The drive letter will disappear. To use this disk space, follow the steps in the next section to remove the partition.
Removing a Partition
You can clear storage space and access it on your computer by removing partitions. A partition can be removed from the “Disk Management” in the “Computer Management” window by selecting Delete Volume, and adding unallocated space to another disk.
Important!
Deleting a volume will result in the removal of all data stored in it. Make a backup of the data you need.
Create a backup of the data you want to keep from the disk you want to delete. Go to the “Disk Management” utility window and right-click on the drive letter you want to remove. Click on “Change Drive Letter and Paths…”

In the “Change Drive Letter and Paths” window, click on Remove…

A warning window from the “Disk Management” utility will appear. To continue, click Yes.

The drive letter will disappear. To use this disk space, follow the actions in the next section to remove the partition.
Delete Partition
Storage space can be cleared and accessed on a computer by deleting partitions. A partition can be deleted from the “Disk Management” option in the “Computer Management” window by selecting Delete volume and adding unallocated space to another disk.
Attention!
Deleting a volume will result in the removal of all data stored in it. Make a backup of the data you need.
Open the “Disk Management” utility. Select the partition you want to delete. Right-click on the volume or partition to be deleted and click Delete Volume…

If you have backed up the necessary data, click Yes. The drive letter will disappear, and the partition will be displayed as Free Space.

Right-click on the disk designation to which you want to add unallocated space. In the menu that appears, select Extend Volume…

The Extend Volume Wizard window will open. Click the Next button.

The Select Disks window will appear. Do not change the settings. Click the Next button.

Click the Finish button.

Now the previously unallocated space can be used again.
Additional Information
If you are looking for a solution for efficient data storage and management on the Windows operating system, you may want to consider Windows KVM, a virtualization technology that allows running multiple instances of the Windows OS on a single physical server. This approach helps optimize resource usage and reduce hardware costs.
However, if you require full control over the server, a Dedicated Server is a preferable option. This type of server provides dedicated computing resources, memory, and bandwidth, making it ideal for large projects or high-demand applications.


