In this article, we will describe the steps necessary to replace a faulty hard disk in a software RAID 1 array on various operating systems, such as Linux (CentOS, Debian, Ubuntu).
Problem Identification
To begin with, let’s understand the problem. You have a physical server with CentOS 7 installed on it, equipped with 2 HDDs of 2 TB each: /dev/sda and /dev/sdb. These disks are configured into a software RAID 1. Let’s assume that the disk sdb has failed. When you check the disk in the array, you’ll see the following:
# cat /proc/mdstat
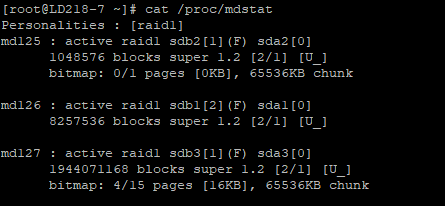
We have three arrays:
# /dev/md125 – /boot
# /dev/md126 – swap
# /dev/md127 – /
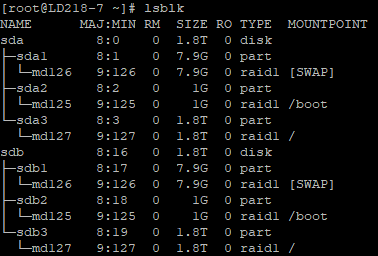
In this case, you can see that the disks are indeed configured in a RAID 1. When the array is healthy, it is displayed as [UU]. Since the disks are mirrored, each partition combines with its counterpart and is named accordingly. For example, md125 consists of sda2 and sdb2. In this case, md125 is /boot. You can get more detailed information about the disk layout using the following command:
# lsblk
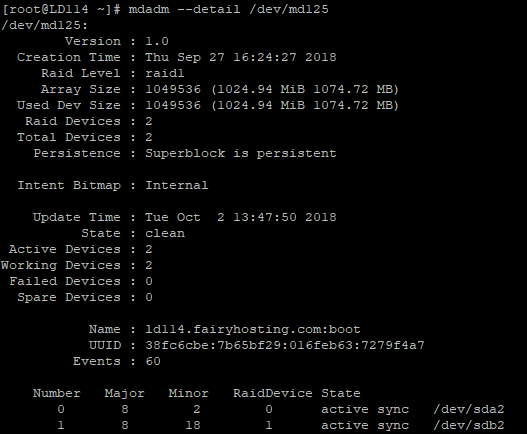
If you want detailed information about the array and its contents, use the command:
# mdadm –detail /dev/md125
Removing the Faulty Disk
To install a new disk in a RAID 1 array, you must first remove the faulty disk. This procedure is carried out for each partition.
# mdadm /dev/md125 -r /dev/sdb2
# mdadm /dev/md126 -r /dev/sdb1
# mdadm /dev/md127 -r /dev/sdb3
In some cases, the hard disk may be partially damaged. For example, the status is [U_] for the /dev/md127 array, while other arrays have a status of [UU]. In this case, you need to specify only one command:
# mdadm /dev/md127 -r /dev/sdb3
As a result, the other partitions will be displayed as /dev/sdb1 and /dev/sdb2, which are intact. After attempting to remove the partition from the array, you will see an error.
To correct this and remove them, you will need to execute the following commands:
# mdadm –manage /dev/md125 –fail /dev/sdb2
# mdadm –manage /dev/md126 –fail /dev/sdb1
This will change their status to [U_]. Continue the procedure as you did with the md127 array.
Check the disks and partitions included in the array to ensure that the disk has been fully removed:
# mdadm –detail /dev/md125
# mdadm –detail /dev/md126
# mdadm –detail /dev/md127
# cat /proc/mdstat
Now the disk is ready for replacement. You will need to submit a request through our ticket system to replace the disk and coordinate the timing of the work with a technician.
P.S. The server will be down for some time!
Preparing the New Disk
Determining the partition table (GPT, MBR) and transferring it to the new disk.
A new disk, when part of the array, must have exactly the same partitioning. Depending on the types of partition table used (GPT/MBR), you need to use the appropriate utilities to copy the partition table.
GPT – sgdisk
MBR – sfdisk
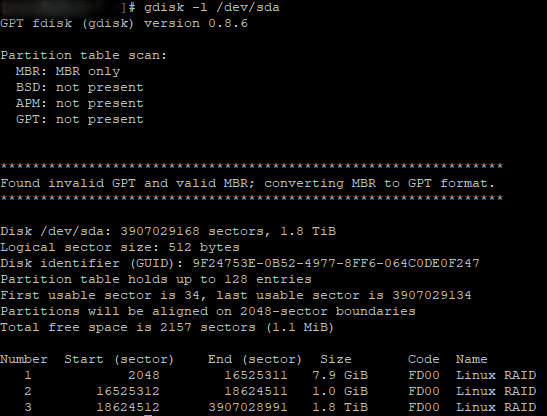
Since we have 2 TB HDDs, we will use the sgdisk utility. You can also see what exactly you will be copying to the second disk. Use the command:
# gdisk -l /dev/sda
You can download the utility using your operating system’s repository. Depending on the OS, you need to specify the correct package manager.
CentOS: yum install sgdisk/sfdisk
Debian/Ubuntu: apt install sgdisk/sfdisk
Creating and Restoring MBR/GPT Backup
Before copying the partition table to the new disk, it is recommended to make a backup. In case of any problems, you can restore the original partition table.
For MBR
Create:
# sfsdisk –dump /dev/sdx > sdх_parttable_mbr.bak
Restore:
# sfdisk /dev/sdb < sdх_parttable_mbr.bak
For GPT
Create:
# sgdisk –backup=sdх_parttable_gpt.bak /dev/sda

Restore:
# sgdisk –load-backup=sdх_parttable_gpt.bak /dev/sdb
![]()
sda – the disk from which the copy is made.
sdb – the disk onto which the copy of the table is loaded.
Adding a Hard Disk to the Array After Replacement
First, insert the copied partition table from the first disk into the new one using the command above. Once the faulty disk has been removed from the array, you can add the new one. This must be done for each partition.
# mdadm /dev/md125 -a /dev/sdb2
# mdadm /dev/md126 -a /dev/sdb1
# mdadm /dev/md127 -a /dev/sdb3
Now the new disk is part of the array. You can monitor the synchronization of the disks by entering the following command:
# cat /proc/mdstat

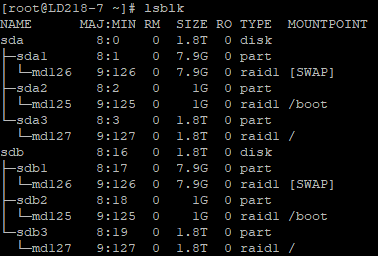
Next, reboot the server, and you will see that all partitions are correctly mounted:
# lsblk
Conclusion
Replacing a disk in a Software RAID 1 is a necessary procedure to maintain data security and integrity on both a Cloud KVM Server and a Dedicated Server. Before performing this procedure, make sure you have sufficient knowledge and experience, or seek assistance from a professional. Following the recommendations of your hosting provider and regularly replacing disks can prevent data loss and ensure uninterrupted operation of your business applications.


