Ievads
Visiem veltītajiem un virtuālajiem serveriem ir IPv4 adrese, kā arī /64 IPv6 apakštīkls. Papildu IPv4 adreses varat pasūtīt, izmantojot klienta sadaļu.
Galvenā adrese
Servera galvenā IPv4 adrese ir adrese, kas sākotnēji piešķirta serverim un ir konfigurēta automātiskajos uzstādījumos. IPv6 gadījumā nav skaidri definētas galvenās adreses. Automātiskajos uzstādījumos no piešķirtā apakštīkla tiek konfigurēts ::2. Ar veltītajiem saknes serveriem un virtuālajiem serveriem no CX līnijas IPv6 apakštīkls tiek marsrutēts uz tīkla adaptera link-lokālās adreses. Ja pasūtījāt papildu vienas IPv4 adreses ar saviem MAC adresēm, tad IPv6 apakštīklu variet marsrutēt uz to link-lokālo adresi, izmantojot klienta sadaļu. Konkrētā link-lokālā adrese tiek aprēķināta no MAC adreses, izmantojot RFC 4291, un tiek konfigurēta automātiski:
# ip address 2: eth0: <BROADCAST,MULTICAST,UP,LOWER_UP> mtu 1500 qdisc pfifo_fast state UP qlen 1000 link/ether 54:04:a6:f1:7b:28 brd ff:ff:ff:ff:ff:ff inet6 fe80::5604:a6ff:fef1:7b28/64 scope link valid_lft forever preferred_lft forever VQ/VX līnijas) nav IPv6 apakštīkla /64 maršrutēšanas. Tā ir vietējā tīkla, kur ::1 no apakštīkla tiek izmantots kā vārteja. (Skatīt zemāk). Zemāk tiek izmantota <10.0.0.2> kā piemēra galvenā IPv4 adrese. Tā nav reāla IP adrese.
Papildu adreses
Galvenajai IP adresei parasti tiek marsrutētas gan individuālas adreses, gan adreses no apakštīkliem. Šajā ceļvedī pieņemsim, ka jums ir šādas papildu adreses/tīkli:
<2001:db8:61:20e1::/64>(IPv6 apakštīkls)<10.0.0.8>(viens adrese)<203.0.113.40/29>(IPv4 apakštīkls)
Saskaņā ar saviem priekšrociēm jūs varat turpmāk sadalīt, nosūtīt vai piešķirt piešķirtos apakštīklus. Ar IPv4 tīklā un raidīšanas adresēm parasti tiek rezervētas. Balstoties uz iepriekšējo piemēru, tas būtu IP <203.0.113.40> un <203.0.113.47>. Šīs adreses var izmantot kā papildu IP vai daļu no punkta uz punktu iestatījuma. Rezultātā /29 apakštīklā visas 8 IP adreses ir lietojamas, nevis tikai 6. IPv6 gadījumā pirmā adrese (::0) no apakštīkla tiek rezervēta kā Subnet-Router anycast adrese. IPv6 neizmanto raidīšanas adresi, tāpēc pēdējo adresi var izmantot (atšķirībā no IPv4).
Vārteja
IPv6 dediķētajiem saknes serveriem un virtuālajiem serveriem no CX līnijas vārteja ir fe80::1. Tā kā tā ir link-lokālā adrese, ir nepieciešama tīkla adaptera (parasti eth0) skaidra specifikācija:
# ip route add default via fe80::1 dev eth0Ar vecākiem virtuālo serveru modeļiem (VQ/VX līnijas) vārteja atrodas piešķirtajā apakštīklā:
# ip address add 2001:db8:61:20e1::2/64 dev eth0# ip route add default via 2001:db8:61:20e1::1IPv4 gadījumā vārteja ir katra apakštīkla pirmā lietojamā adrese:
# Piemērs: 10.0.0.2/26 => Tīkla adrese ir 192.0.2.64/26## ip address add 10.0.0.2/32 dev eth0# ip route add 192.0.2.65 dev eth0# ip route add default via 192.0.2.65Individuālas adreses
Jūs varat konfigurēt piešķirtās adreses kā papildu adreses tīkla interfeisā. Lai nodrošinātu, ka IP adreses tiek saglabātas pēc restartēšanas, jums ir jāpielāgo operētājsistēmas/izplatīšanas attiecīgo konfigurācijas faili. Plašāku informāciju varat atrast lapās Debian/Ubuntu un CentOS. Pievienojiet (papildu) IP adresi:
ip address add10.0.0.8/32 dev eth0Vai arī to var nosūtīt iekšpusē servera (piemēram, virtuālajām mašīnām):
ip route add10.0.0.8/32 dev tap0 # vaiip route add10.0.0.8/32 dev br0Attiecīgajām virtuālajām mašīnām jāizmanto servera galvenās IP adreses kā noklusējuma vārteju.
ip route add10.0.0.2 dev eth0 ip route add default via 10.0.0.2Nodrošiniet, ka ir iespējota IP pārsūtīšana, ja jūs pārsūtāt IP:
sysctl -w net.ipv4.ip_forward=1Ja esat Robotā iestatījis atsevišķu MAC adresi IP adresei, tad ir jāizmanto attiecīgās IP adresei paredzētā vārteja.
Apakštīkli
Jaunpiešķirtie IPv4 apakštīkli tiek statiski maršrutēti uz servera galveno IP adresi, tāpēc nav nepieciešama vārteja. Jūs varat piešķirt IP adreses kā papildu adreses tīkla adapteriem, tāpat kā vienkāršas papildu IP adreses:
ip address add203.0.113.40/32 dev eth0Jūs varat tās pārsūtīt individuāli vai kopumā.
ip route add203.0.113.40/29 dev tun0 # vaiip route add203.0.113.40/32 dev tap0Atšķirībā no vienkāršām IP adresēm jūs varat arī piešķirt apakštīklu IP adreses (virtuālajām mašīnām), izmantojot DHCP. Šim nolūkam jums ir jākonfigurē adrese no apakštīkla uz saimnieka sistēmu.
ip address add203.0.113.41/29 dev br0 Uz br0 esošie resursi izmanto šo adresi kā vārteju. Atšķirībā no vienkāršajām IP adresēm tad attiecas apakštīklu noteikumi; piemēram, jūs nevarat izmantot tīkla un raidīšanas IP adresi. IPv6 gadījumā apakštīkla maršrutēšana uz link-lokālo adresi rada daudzas iespējas apakštīkla tālākai sadalīšanai dažādās lielumos (/64 līdz /128). Piemēram:
2a01:04f8:0061:20e1:0000:0000:0000:0000 │ │ │ │ │ │ │ └── /112 Apakštīkls │ │ │ │ │ └── /96 Apakštīkls │ │ │ └── /80 Apakštīkls │ └── /64 ApakštīklsPirms apakštīklu pārsūtīšanas pārliecinieties, vai pārsūtīšana ir aktīva:
sysctl -w net.ipv6.conf.all.forwarding=1 net.ipv4.ip_forward=1Jūs varat pārsūtīt visu apakštīklu (piemēram, VPN):
ip route add2001:db8:61:20e1::/64 dev tun0Vai arī tikai daļu:
ip route add 2001:db8:61:20e1::/80 dev br0No viena apakštīkla jūs varat izvilkt individuālas adreses, un jūs varat pārsūtīt atlikumu. Ņemiet vērā prefiksu garumus:
ip address add2001:db8:61:20e1::2/128 dev eth0 ip address add2001:db8:61:20e1::2/64 dev br0 Uz br0 esošie resursi rādīs <2001:db8:61:20e1::2> kā vārteju.
SLAAC (IPv6)
Jūs varat izmantot SLAAC (Stateless Address Autoconfiguration) savienotajos resursos (br0), instalējot radvd uz resursu saimnieka. Konfigurācijai /etc/radvd.conf ir nepieciešams, lai resursu saimniekam būtu adrese no <2001:db8:61:20e1::> uz tilta vai TAP ierīces:
interface tap0 { AdvSendAdvert on; AdvManagedFlag off; AdvOtherConfigFlag off; prefix 2001:db8:61:20e1::/64 { AdvOnLink on; AdvAutonomous on; AdvRouterAddr on; }; RDNSS 2001:db8:0:a0a1::add:1010 2001:db8:0:a102::add:9999 2001:db8:0:a111::add:9898 { }; };Tādējādi resursi automātiski saņems maršrutus un adreses no apakštīkla. To var redzēt resursos:
$ ip address 2: eth0: <BROADCAST,MULTICAST,UP,LOWER_UP> mtu 1500 qdisc pfifo_fast state UP qlen 1000 link/ether 08:00:27:0a:c5:b2 brd ff:ff:ff:ff:ff:ff inet6 2001:db8:61:20e1:38ad:1001:7bff:a126/64 scope global temporary dynamic valid_lft 86272sec preferred_lft 14272sec inet6 2001:db8:61:20e1:a00:27ff:fe0a:c5b2/64 scope global dynamic valid_lft 86272sec preferred_lft 14272sec inet6 fe80::a00:27ff:fe0a:c5b2/64 scope link valid_lft forever preferred_lft forever(Redzams: privātā adrese, apakštīkla SLAAC adrese un saites linka RFC 4291 lokālā adrese.)
Izmantojiet virtualizāciju ar maršrutēšanas metodi

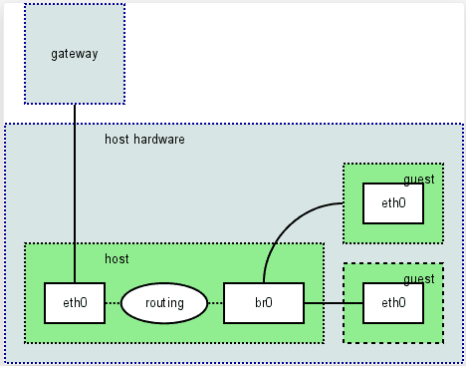
routed method, you configure a new network interface on the server to which one or more VMs are connected. The server itself acts as a router, hence the name. The advantage of the routed method is that traffic has to flow through the host. This is useful for diagnostic tools (tcpdump, traceroute). It is also necessary for operating a host firewall that performs the filtering for the VMs. Some virtualization solutions create a network interface per unit (like Xen and LXC), and you may need to couple them with a virtual switch (e.g., via a bridge or TAP interface).
- Xen: For each domU, an interface vifM.N (unfortunately with dynamic numbers) shows up in the dom0. These can be assigned addresses accordingly. Alternatively, you can combine VIFs into a segment using a bridge interface; you can do this via
vif=['mac=00:16:3e:08:15:07,bridge=br0',]directives, in/etc/xen/vm/meingast.cfg. - VirtualBox: Guests are tied to an existing TAP interface and thus form a segment per TAP device. Create TAP interfaces according to your distribution. In the settings dialog of a single machine, select for assignment:
Network>Attached to: Bridged Adapter. Name:tap0. - VMware Server/Workstation: Using your VMware programs, create a host-only interface (e.g., vmnet1) and add the address area to it. Assign the VMs to this created host-only interface.
- Linux Containers (LXC, systemd-nspawn, OpenVZ): For each container, an interface ve-… shows up in the parent. These can be assigned addresses accordingly. Alternatively, you can combine VE interfaces with a bridge interface.
- QEMU: Uses TAP, similar to VirtualBox.
Use virtualization with the bridged method

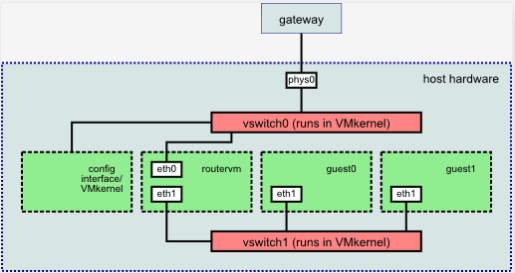
- VMware ESX: ESX sets a bridge to the physical adapter, which the VM kernel hangs on, and which you can bind further VMs to (for example, a router VM that runs the actual operating system). In ESX, you can define further virtual switches, which are then made available to the router VM via other NICs.
- The other virtualization solutions let you use the bridged mode, but for the sake of simplicity, we will only use the simpler routed method, since it is also easier for troubleshooting (e.g., mtr/traceroute). Only ESX truly requires bridged mode.
- Using the bridged mode currently requires the sysctl function
net.ipv4.conf.default.proxy_arp=1(e.g., with Xen).


