This article provides instructions on utilizing the Zone Editor within cPanel for the purpose of overseeing custom DNS records.
About DNS records
A DNS (Domain Name System) name server preserves DNS records associated with a domain name. Various types of DNS records exist, with some of the most frequently encountered ones including:
- A records: The purpose of an A record is to link a domain name (e.g. example.com) with an IP address (e.g. 212.47.213.194).
- CNAME records: CNAME (canonical name) records define aliases by associating one domain name with another. For instance, you can create a CNAME record linking “mail.example.com” to “example.com.” When a DNS lookup is performed for “mail.example.com,” it will return the associated domain “example.com,” and subsequently carry out a lookup on its A record. CNAME records allow you to define multiple domains without the need to specify an IP address for each one.
- TXT records: TXT records have the ability to store any type of arbitrary text data. They are often used to define SPF (Sender Policy Framework) or DKIM (DomainKeys Identified Mail) settings.
Using the Zone Editor in cPanel
For the configuration of DNS records for your domain, cPanel offers a Zone Editor tool. The Zone Editor provides a convenient and efficient means to modify DNS records for one or multiple domains associated with your account.
Adding a record
Please, follow these steps to add a record using the Zone Editor:
- Click Zone Editor in the DOMAINS section of the cPanel home screen:

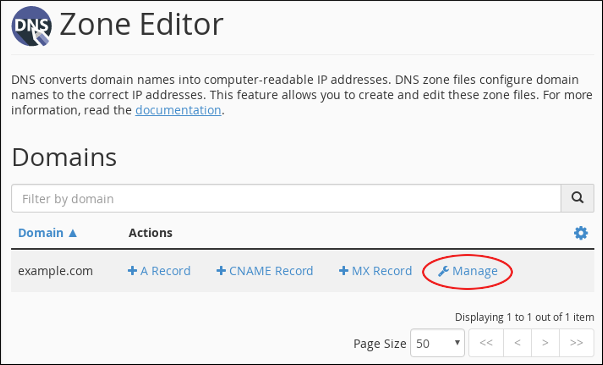
- Locate the domain for which you want to add a record under Domains, and then click Manage:

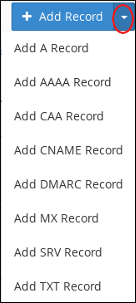
- Click the down arrow to Add Record, and then click the type of record you want to add:

- Type the fully-qualified domain name (FQDN) for the record in the Name text box.
- Type the time-to-live value in seconds in the TTL text box.
If you are uncertain about what value to specify, enter “14400,” which equates to a duration of four hours.
- Confirm that the Type list box contains the type of record that you want to add.
- Type the value for the record in the Record text box.
- When adding an A record, input the IP address that you wish to associate with the domain name you selected in step 2.
- When adding a CNAME record, enter the corresponding canonical name for the domain name you selected in step 2.
- When adding a TXT record, input the desired data for the TXT record.
- Click Add Record, and cPanel adds the record.
Editing a record
Please, follow these steps to edit a record using the Zone Editor:
- Click Zone Editor in the DOMAINS section of the cPanel home screen:

- Locate the domain for which you want to add a record under Domains, and then click Manage:

- Locate the record you want to edit, and then click Edit under Actions:

- Modify the value or values you want to change, and then click Save Record. cPanel updates the record.
Be careful! Altering certain record types may result in a website becoming unreachable, disrupt proper email functionality, or lead to other unintended consequences.
Deleting a record
Please, follow these steps to delete a record using the Zone Editor:
- Click Zone Editor in the DOMAINS section of the cPanel home screen:

- Locate the domain for which you want to add a record under Domains, and then click Manage:

- Locate the record you want to delete, and then under Actions, click Delete:

- At the Confirm Deletion prompt, click Continue. cPanel deletes the record.
Be careful! Altering certain record types may result in a website becoming unreachable, disrupt proper email functionality, or lead to other unintended consequences.
Looking for an outstanding cPanel-based web hosting provider? Try our web hosting packages with cPanel


